Today we will make a pattern from an existing shell top. Here are the supply’s you will need.
- top
- Ruler
- Tape measure
- Paper
- Pen
Let’s get started
Measuring Your Top
First you need the length of your garment so you take the measurement from the high point @ shoulder or the HPS to the bottom edge
Next you need to know the width of your top so you measure 1” down from the armhole to get the across chest measurement and then measure at the bottom edge. Here they are the same measurement and you can mark that on your flat sketch
By the way to learn how to make a flat sketch from a garment check out my previous video ‘how to draw a flat sketch from a garment’
Because this top is a box shape and not much tailoring involved I’m taking the straight measurement of the armhole instead of on the curve as you would normally.
The armhole is larger than the sleeve opening so you have to take the measurement at the sleeve hem as well. There is about an inch cuff at the bottom of the sleeve which I’ll show you how to transfer to the pattern later in this video.
Next measurement is the sleeve length.
Now we move to the neck width which is measured straight from neck point to neck point. Using a ruler, align it to the top edge of the neck points then measure down to the back neck edge. This measurement is the back neck drop. Keeping the ruler in place do the same thing for the front neck drop and mark both measurements on your flat sketch.
In order to find the shoulder slope, keep your ruler where it is and move it straight across to match up at the sleeve seam at the shoulder. Measure from bottom edge of the ruler to the top edge of the top @ the sleeve seam.
The across shoulder measurement is taken from the center front to the top edge of the sleeve seam @ shoulder.
Measure your button width and add the measurement to your center front for the placket.
Measure the height of the side vent.
The back shoulder folds over to the front so take that measurement as well. On this garment it measures 1” so add that to your flat sketch so you can add that to your pattern.
Now you’re ready to draft your pattern.
I’m using adobe illustrator for its ease of use, but if you want to do it by hand so you won’t have to tape together the pattern you would need the following supplies.
- Pattern Paper
- 2” X 18” Clear Ruler
- French Curve
- Measuring Tape
- Pencil
- Eraser (just in case)
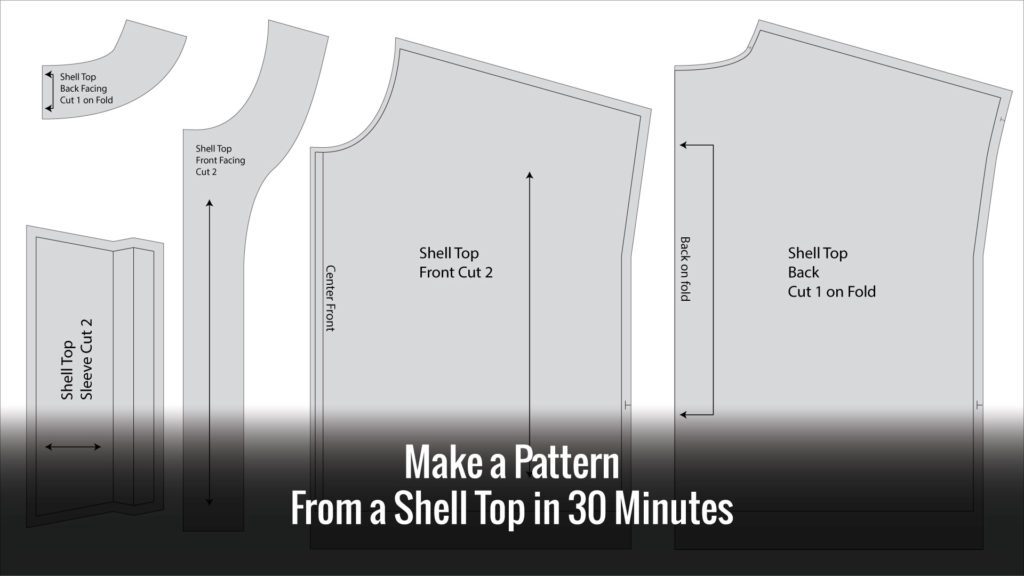
Make a box, the length should be the length of the top and the width should be the width of the top.
Back Top Pattern Piece
Use half the neck measurement, measure horizontally from the left edge and mark @ the top. Use your back neck drop measurement and mark on the vertical line from the same point. Using a French curve and draw the back neck.
On the other side of the rectangle, use the shoulder slope measurement and mark down from the top. Draw a line from HPS to the shoulder slope mark.
If the across shoulder is wider than the across chest measurement you have to add the difference here. For instance, this shirt measures 31” wide. Half of that is 15 ½”. The across shoulder measurement is 16” so that’s a ½” difference. So here I would move the shoulder slope mark out ½”. In the video I added 1” because I removed the curve in the armhole to make it easier to demonstrate.
Next, using your armhole measurement, mark down from shoulder point and draw a line from point to point.
Front Top Pattern Piece
The front is the same as the back except for the front neck. Measure down from the HPS and mark the front neck drop. Using a French curve and draw the front neck.
Label both pattern pieces, the back is cut on a fold and cut two of the front.
Shoulder Fold Over
On this top, 1” from the back pattern folds over to the front. So we have to transfer 1” of the front pattern at the shoulder to the back pattern piece.
Adding Seam Allowance
For home sewing patterns a 5/8” seam allowance is added everywhere there is a seam. In the fashion industry production patterns use as little seam allowance as possible to cut down on fabric usage. Less fabric equals less money per garment.
So we will apply the industry standard here. Around the front and neck the seam allowance is ¼”. Everywhere else it is ½” except the hem which is determined by the design of the garment.
On this garment the hem is 1” finished, so I’m adding 2” to the pattern so it can be folded twice so it finishes well with the side vents.
On the front of this garment there are buttons so we have to make an allowance for them. The buttons are 3/8” wide so I added 3/8” to the center front plus ¼” seam allowance.
Mark the vent notches. This is to indicate where to stop sewing to allow for the vent.
Front and Back Neck Facing
Mark 2” from the neck at the shoulder seam and 2” from the front at the hem. Trace the front and neck shape to make your front facing. Do the same for the back facing just around the neck.
Sleeve
Using your armhole measurement, multiply it by 2 and do the same from the sleeve hem measurement. In the video example the armhole length is 7 ¼” so that will be 14 ½” and the width @ the sleeve hem was 6 ½” which would be 13”. The sleeve length is 4”. Draw the sleeve pattern with the measurements 141/2” wide at the top. 13” wide at the bottom and 4” high.
Sleeve Hem
At the sleeve bottom edge draw a line 1” up from edge. Copy that 1” shape and add it to the bottom edge of the sleeve so that the side edges are the same width. Duplicating the added shape again and adding it to the bottom edge to give an accordion shape. Because the sleeve is smaller at the bottom then it is when you fold the hem, the hem has to mirror the shape of the sleeve so the hem doesn’t bunch up when folded.
Mark All Pattern Pieces
- All pattern pieces should have the pattern name or style number
- How many pieces to cut
- Any notches that are need to aid with sewing
- Grain lines and fold lines so you know how to cut your pattern pieces.
That’s it! Do you have any questions for me? Let me know in the comments below!